.png)
.png)
.png)

5 Proven Steps to Hydraulic Motor Replace Danfoss Orbit Motor — A 2025 Buyer’s Guide
October 15, 2025
Abstract
The process of sourcing a suitable hydraulic motor replacement for a Danfoss orbit motor presents a significant engineering and economic challenge for equipment operators globally. This task moves beyond a simple component swap, demanding a nuanced understanding of critical technical parameters to ensure operational integrity and longevity. This document outlines a systematic, five-step methodology for identifying, vetting, and installing an aftermarket orbit motor. It examines the fundamental specifications, including displacement, pressure ratings, shaft configuration, and mounting interfaces, which are paramount for achieving a seamless fit and function. The analysis addresses the economic rationale for considering aftermarket options, balancing initial cost savings against long-term reliability and performance. By dissecting the Danfoss model code and establishing a framework for comparing original equipment manufacturer (OEM) and replacement unit datasheets, this guide empowers maintenance professionals and procurement specialists. The objective is to make an informed decision that restores machinery to its operational capacity while mitigating the risks of incompatibility, premature failure, and extended downtime.
Key Takeaways
- Decode the motor's nameplate to identify all critical specifications before searching.
- Match displacement, pressure, shaft, and mounting flange for a successful replacement.
- Vet aftermarket suppliers for warranty, technical support, and manufacturing quality.
- Properly flush the hydraulic system before installing any new motor to prevent contamination.
- The key to a successful hydraulic motor replace Danfoss orbit motor is methodical verification.
- Perform a low-pressure break-in procedure to ensure longevity of the new unit.
- Verify the replacement motor's rotation matches the original system's requirement.
Table of Contents
- Understanding the Core Challenge: Why Replace a Danfoss Orbit Motor?
- Step 1: Decode Your Existing Danfoss Motor's Identity
- Step 2: Master the Five Critical Technical Specifications
- Step 3: Navigate the Aftermarket: Sourcing a Reliable Replacement
- Step 4: The Installation Process: Ensuring a Seamless Transition
- Step 5: Post-Installation Care and Performance Verification
- Frequently Asked Questions (FAQ)
- Conclusion
- References
Understanding the Core Challenge: Why Replace a Danfoss Orbit Motor?
When a piece of machinery grinds to a halt, the silence is often filled with a sense of urgency and financial pressure. If the heart of that machine is a Danfoss orbit motor, the path forward might seem straightforward: order an identical replacement from the original equipment manufacturer (OEM). Yet, for many operators in regions like South America, Russia, Southeast Asia, and the Middle East, this direct path is often complicated by high costs, long lead times, and logistical hurdles. This situation gives rise to a fundamental question: how does one find a reliable, compatible, and cost-effective alternative without compromising the performance and safety of the equipment? The exploration of this question is not merely a technical exercise; it is an economic and practical necessity.
The Legacy and Reliability of Danfoss
To appreciate the challenge of replacement, one must first understand the product being replaced. Danfoss has cultivated a formidable reputation in the fluid power industry, and its orbit motors are widely regarded as benchmarks for quality and durability. Their design, often featuring a gerotor or Geroler gear set, is known for producing high torque at low speeds, a characteristic that makes them indispensable in applications ranging from agricultural harvesters and construction skid-steers to industrial conveyors and marine winches. This established performance creates a high standard. Any replacement must not only physically fit but also replicate the functional robustness that operators have come to expect. The decision to move away from an OEM part is, therefore, never taken lightly; it is born from a careful weighing of trust in a known brand against pressing external circumstances.
Economic Realities: OEM Costs versus Aftermarket Value
The most compelling driver for seeking an alternative is often economic. OEM parts carry a premium price, a reflection of the brand's research, development, marketing, and extensive distribution network. For a business operating on tight margins, the cost of a new Danfoss motor can represent a significant capital expenditure. Aftermarket manufacturers, on the other hand, can often provide a functionally equivalent motor at a fraction of the cost. They achieve this by focusing on reverse-engineering proven designs, optimizing manufacturing processes, and operating with lower overheads. The promise of significant cost savings is alluring, but it brings with it a responsibility for due diligence. The central task becomes distinguishing a high-value aftermarket motor from a low-quality imitation that could lead to more significant losses through premature failure and subsequent downtime (Dalton et al., 2017). A successful hydraulic motor replace Danfoss orbit motor project hinges on finding this balance between cost and quality.
Supply Chain Hurdles and Availability in 2025
The global supply chain remains a complex and sometimes fragile network. As of 2025, operators in many parts of the world continue to face extended lead times for specific OEM components. A machine could be out of commission for weeks or even months while waiting for a part to be shipped from a central warehouse in another continent. This downtime translates directly into lost revenue and productivity. Local and regional aftermarket suppliers can often fill this gap, holding inventory of common replacement motors that can be delivered in a matter of days, if not hours. This immediate availability can be the deciding factor, making the aftermarket not just a cheaper option, but the only practical one to get critical operations back online swiftly.
The Promise of a High-Quality Replacement
The aftermarket for hydraulic components is not a monolith. It ranges from highly reputable engineering firms with rigorous quality control to small workshops producing parts of questionable integrity. The promise of a successful replacement lies in navigating this landscape effectively. A high-quality aftermarket orbit motor is one that has been manufactured to meet or exceed the specifications of the original. It uses comparable materials for its housing, shaft, and internal components, features high-quality seals to prevent leaks, and is backed by a supplier who provides transparent technical data and a meaningful warranty. Finding such a replacement transforms the situation from a risky compromise into a strategic business decision, one that can reduce operational costs without sacrificing reliability. This guide is dedicated to illuminating the path toward making such a decision with confidence.
Step 1: Decode Your Existing Danfoss Motor's Identity
Before you can find a destination, you must know your starting point. In the context of replacing a hydraulic motor, this means achieving a complete and unambiguous identification of the unit currently installed on your machine. Every detail matters. Attempting to source a replacement based on assumptions or incomplete information is a recipe for frustration, leading to wasted time and money on a part that does not fit or function correctly. The first and most critical step is to become a detective and uncover the precise identity of your Danfoss motor.
Locating and Interpreting the Nameplate
The most valuable piece of evidence is the motor's nameplate or data tag. This is typically a small metal plate or a durable sticker affixed to the motor's housing. Its location can vary, but it is usually placed in a visible area on the main body. You may need to clean away grease, dirt, or paint to read it clearly. Do this carefully with a soft cloth and a mild degreaser; avoid using abrasive tools like wire brushes or scrapers that could scratch and obliterate the information.
This nameplate is the motor's birth certificate. It contains a coded string of letters and numbers—the model code—that precisely defines its every characteristic. It may also list a serial number for tracking and a part number, which can be specific to the machine's OEM. Photograph the nameplate with your phone, ensuring the image is clear and legible. This digital record is invaluable, especially when communicating with potential suppliers.
The Anatomy of a Danfoss Model Code
The model code is not a random sequence. It is a structured language that describes the motor in detail. While the exact structure can vary slightly between different Danfoss series (e.g., OMP, OMR, OMT, OMS), it generally follows a consistent pattern. Let's imagine a hypothetical model code to understand how it works. Consider the code: OMT 250 151B3001.
- OMT: This prefix identifies the motor series or family. 'OMT' is a specific series known for its high-performance characteristics. Other common prefixes include 'OMP', 'OMR', 'OMS', 'OMV', etc. This is the first piece of the puzzle, telling you the general type and duty rating of the motor.
- 250: This number almost always represents the motor's displacement in cubic centimeters per revolution (cm³/rev). This is arguably the most important single parameter. It dictates the motor's speed for a given oil flow and its torque for a given pressure. In this case, the displacement is 250 cm³/rev.
- 151B3001: This latter part of the code is the configuration code. It is a highly specific sequence that details the physical attributes of the motor. It specifies the mounting flange, the shaft type and size, the port types and locations, and other special features like high-pressure seals or a case drain.
Understanding this structure is empowering. When you see this code, you are not just looking at a part number; you are reading a detailed description. A supplier of quality aftermarket orbit hydraulic motors will be able to use this full code to find a direct crossover or a functionally identical replacement.
What to Do When the Nameplate is Missing or Illegible
In the real world of heavy machinery, nameplates often fall victim to abrasion, corrosion, or paint jobs. If the code is gone, do not despair. The process becomes more hands-on, but a positive identification is still possible. You must now manually measure the motor's critical dimensions.
- Measure the Shaft: Is it keyed, splined, or tapered? For a keyed shaft, measure its diameter and the width of the keyway. For a splined shaft, you must count the number of splines and measure the major diameter. A tapered shaft requires measuring the diameter at both the large and small ends.
- Identify the Mounting Flange: Look at where the motor bolts to the machine. Is it a 2-bolt flange? A 4-bolt flange? A circular wheel mount? Measure the bolt hole spacing (center to center) and the diameter of the pilot (the raised circular section that centers the motor in the bracket).
- Identify the Ports: Examine where the hydraulic hoses connect. What type of threads are they? You may need thread gauges to determine if they are BSPP (British Standard Parallel Pipe), NPT (National Pipe Taper), or SAE O-ring Boss. Measure the thread diameter.
- Estimate Displacement: This is more challenging without a nameplate. Sometimes, the motor series and physical size can give a clue. An experienced hydraulics technician might be able to estimate the displacement based on the motor's dimensions and the machine's function. In some cases, you may find a casting number on the motor housing that a knowledgeable supplier can cross-reference.
Creating a "Motor Passport": Documenting Every Detail
Whether you get the information from a nameplate or through manual measurement, you should compile it into a single document—a "motor passport." This document should include:
- Full Model Code (if available)
- Motor Series (e.g., OMP, OMR, OMT)
- Displacement (cm³/rev or in³/rev)
- Shaft Type and all relevant dimensions
- Mounting Flange Type and all relevant dimensions
- Port Type, Size, and Location
- Rotation (if specified, e.g., bidirectional)
- Any special features (e.g., case drain port, high-pressure seal)
- Clear photographs of the motor from multiple angles, including close-ups of the shaft, flange, and ports.
This passport becomes your primary tool in the search for a replacement. When you approach a supplier, you are not asking a vague question ("Do you have a motor for my tractor?"). Instead, you are presenting a precise set of specifications, enabling them to provide a fast and accurate answer. This preparation is the foundation of a successful project to hydraulic motor replace Danfoss orbit motor.
Step 2: Master the Five Critical Technical Specifications
With the identity of your old motor established, the next phase involves translating that identity into a universal language of technical specifications. The success of your replacement hinges on finding a new motor that is a functional twin to the old one. While many factors contribute to a motor's performance, five parameters stand out as absolutely critical. A mismatch in any of these five areas can lead to anything from inefficient operation to catastrophic failure of the motor or the machine itself. Think of these as the five non-negotiable clauses in the contract between your new motor and your hydraulic system.
Displacement (cm³/rev): The Heartbeat of Your Motor
If a hydraulic motor has a heart, it is its displacement. This value, measured in cubic centimeters per revolution (cm³/rev) or cubic inches per revolution (in³/rev), defines the volume of hydraulic fluid the motor requires to turn one complete revolution. It is the single most important parameter for determining the motor's performance characteristics.
- Relationship to Speed: The rotational speed (RPM) of the motor is directly proportional to the flow rate of the hydraulic fluid supplied by the system's pump and inversely proportional to the motor's displacement. The formula is: Speed (RPM) = [Flow Rate (Liters per minute) * 1000] / Displacement (cm³/rev). This means if you install a motor with a smaller displacement than the original, it will spin faster for the same amount of oil flow. Conversely, a larger displacement motor will spin slower. This could drastically alter the operational speed of your equipment, rendering it either too slow to be productive or too fast to be safe.
- Relationship to Torque: The output torque of the motor is directly proportional to the system pressure and the motor's displacement. A simplified formula is: Torque (Nm) ≈ [Pressure (bar) * Displacement (cm³/rev)] / 62.8. Choosing a motor with a smaller displacement will result in less output torque, meaning it may not have the strength to perform its task.
The imperative is clear: the displacement of the replacement motor must match the original's displacement as closely as possible. A deviation of more than a few percent is generally not advisable without a thorough engineering review of the entire system.
Pressure Ratings (Continuous vs. Intermittent): The Motor's Strength
Pressure is the force that drives the motor. Every motor has a limit to the amount of pressure it can withstand. Datasheets list two key pressure ratings:
- Continuous Pressure Rating: This is the maximum pressure at which the motor can operate continuously without sustaining damage or seeing a significant reduction in its service life. This rating is determined by the strength of the motor's housing, the load capacity of its internal bearings, and its ability to dissipate heat.
- Intermittent Pressure Rating: This is a higher pressure that the motor can tolerate for brief periods during its work cycle (e.g., during start-up or when hitting a momentary obstacle). Operating at this pressure for extended periods will lead to accelerated wear and premature failure.
When selecting a replacement, you must ensure its continuous pressure rating is equal to or greater than the normal operating pressure of your hydraulic system. The intermittent rating should also be sufficient to handle any pressure spikes inherent in the machine's operation. Never substitute a motor with a lower pressure rating; it is a direct invitation for a catastrophic failure, where the motor housing could crack or burst, creating a dangerous high-pressure fluid leak (Zhang & Chen, 2021).
Shaft Configuration: The Physical Handshake
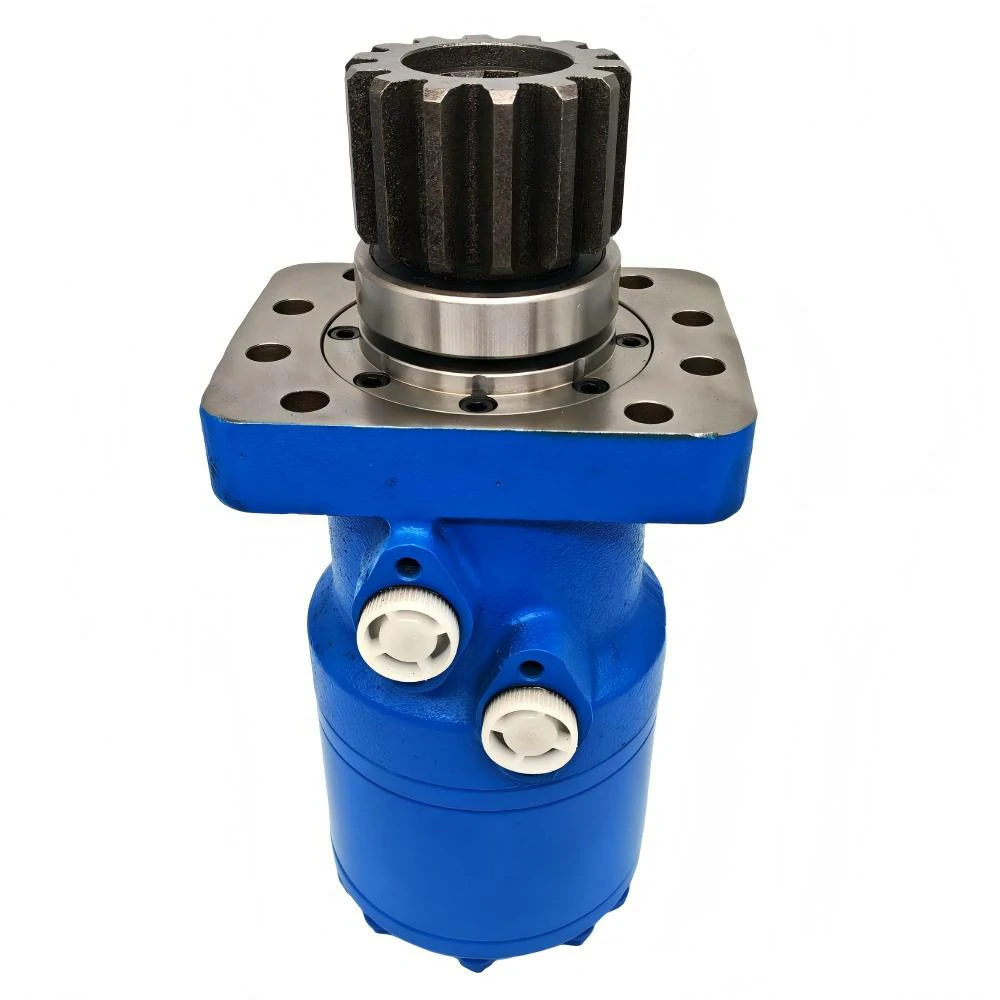
The motor shaft is the point of physical power transmission. It is the "handshake" between the motor and the driven component (a wheel hub, a gearbox, a pulley, etc.). An incorrect shaft means the motor simply cannot be connected. There are three primary types of shafts found on orbit motors, each with its own purpose and application.
| Shaft Type | Description | Advantages | Disadvantages | Common Applications |
|---|---|---|---|---|
| Keyed | A cylindrical shaft with a rectangular slot (keyway) cut along its length. A matching key fits into this slot and a corresponding slot in the hub. | Simple, common, inexpensive to manufacture. Easy to install and remove. | Can be prone to wear and "wallowing out" of the keyway under high-torque, reversing loads. | Conveyors, augers, mixers, general industrial applications. |
| Splined | A shaft with a series of teeth (splines) that mate with internal splines in the hub. | Excellent torque transmission capacity. Distributes load over a large surface area. Good for high-impact and reversing loads. | More complex and expensive to manufacture. Requires precise alignment for installation. | Wheel drives on mobile equipment, winch drives, heavy-duty transmissions. |
| Tapered | A shaft that gradually decreases in diameter along its length, fitting into a matching tapered bore in the hub. It is typically secured with a key and a nut on the end. | Provides a very tight, concentric fit that resists shock loads and fretting corrosion. | Can be difficult to install and remove correctly. Requires specific torque on the retaining nut. | Steering units, applications requiring high precision and resistance to vibration. |
When replacing your motor, you must not only match the type of shaft but also its exact dimensions: the diameter, the length, the keyway size, or the specific number and profile of the splines. There is no room for error here.
Mounting Flange and Port Types: The Foundation and Lifelines
The mounting flange is how the motor is physically bolted to the machine's frame, while the ports are the connections for the hydraulic fluid "lifelines."
- Mounting Flange: The bolt pattern and pilot diameter of the replacement motor's flange must exactly match the original. Common types include SAE 2-bolt, SAE 4-bolt, and various wheel motor mounts. Measure the center-to-center distance of the bolt holes and the diameter of the pilot (the raised ring that centers the motor).
- Ports: The hydraulic ports must match the fittings on your existing hoses. Mismatched threads will cause leaks. The most common thread types in global applications are BSPP (G), NPT, and SAE (UNF) O-ring Boss. Use a thread gauge to be certain. The location and orientation of the ports are also important; if the ports on the new motor are in a different position, your existing hoses may not reach or may become kinked.
| Interface Type | Description | Identification | Typical Use Case |
|---|---|---|---|
| SAE 2-Bolt Flange | An oval-shaped flange with two mounting holes. | Measure bolt hole spacing and pilot diameter. Common standard sizes exist (A, B, C). | Light to medium duty applications, common on many agricultural and industrial motors. |
| SAE 4-Bolt Flange | A square or rectangular flange with four mounting holes. | Measure bolt hole spacing (square pattern) and pilot diameter. | Medium to heavy-duty applications requiring more rigid mounting. |
| Wheel Mount | A circular flange, often with 4 or 5 bolt holes, designed to have a wheel rim bolted directly to it. | Measure bolt circle diameter (BCD) and pilot diameter. | Self-propelled equipment, skid-steers, small mobile vehicles. |
| BSPP (G) Ports | Parallel threads that seal with a bonded washer or O-ring at the base of the male fitting. | Parallel threads, identified by a 'G' prefix (e.g., G 1/2). Common in Europe and Asia. | Versatile, good sealing performance. |
| SAE O-Ring Boss | Straight threads with an O-ring that seals against a chamfered surface in the port. | Straight threads (UNF/UN), identified by a dash size (e.g., -8, -10). Common in North America. | Excellent high-pressure sealing. |
Rotational Speed (RPM) and Torque: The Work Output
While displacement and pressure are the primary inputs that determine the output, it is wise to check the speed and torque ratings on the datasheet of a potential replacement.
- Maximum RPM: Ensure the maximum continuous and intermittent speed ratings of the new motor are suitable for your application. An electric hydraulic pump paired with the wrong motor can lead to overspeed conditions.
- Torque Output: A reputable supplier's datasheet will provide torque curves showing the motor's output torque at various pressures and speeds. You can compare this to the Danfoss datasheet to ensure the performance will be equivalent throughout the operating range. The quest to find a replacement for a Danfoss unit is a search for a motor that speaks the same technical language. By mastering these five critical specifications, you equip yourself to find a true functional equivalent, ensuring your hydraulic motor replace Danfoss orbit motor project is a success.
Step 3: Navigate the Aftermarket: Sourcing a Reliable Replacement
Once you are armed with the precise technical specifications of the motor you need, you are ready to enter the marketplace. The world of aftermarket hydraulic components is vast and varied. It is a landscape populated by highly professional engineering and distribution companies as well as less scrupulous operators. Your task is to navigate this terrain with a discerning eye, looking beyond the initial price to evaluate the true, long-term value of a potential replacement. This step is about building confidence in not just the product, but also the supplier who stands behind it.
Vetting Suppliers: Beyond the Price Tag
The temptation to choose the cheapest available option is strong, especially when facing an unexpected repair bill. However, in the realm of hydraulics, the initial purchase price is only one part of the total cost of ownership. A cheap motor that fails prematurely can cost multiples of its purchase price in lost production, clean-up, and the expense of a second replacement. A thorough vetting of potential suppliers is therefore not an optional step; it is a critical risk-management activity.
Consider these factors when evaluating a supplier:
- Reputation and History: How long has the company been in business? Can you find reviews or testimonials from other customers in your industry or region? A long-standing company with a positive track record is more likely to provide a reliable product and support.
- Technical Support: Can you speak to a knowledgeable person who understands orbit motors? A good supplier will have technical staff who can help you confirm that the replacement motor is a correct match, answer questions about installation, and assist with troubleshooting. If their only response is a part number and a price, be cautious.
- Warranty Policy: What kind of warranty does the supplier offer? A 12-month warranty is a good sign of confidence in the product's quality. Read the warranty terms carefully. Does it cover just the part, or does it account for consequential damages? What is the process for making a claim? A clear, fair warranty is a form of insurance.
- Inventory and Logistics: Does the supplier have the motor in stock, or are they ordering it from another source? A supplier with a physical inventory, like a distributor of high-performance hydraulic motors, can ship immediately, minimizing your downtime. This is particularly important for operators in South America, Southeast Asia, and other regions where international shipping can be slow.
Understanding Material Quality and Manufacturing Standards
Two aftermarket motors might look identical from the outside, but their internal quality can differ dramatically. The longevity of a hydraulic motor is determined by the quality of its materials and the precision of its manufacturing. While it's difficult to inspect these aspects directly before purchase, you can ask informed questions and look for clues.
- Seals: The seals are often the first components to fail. Ask what material the shaft seal is made from. High-quality seals are often made from materials like Viton (FKM), which offers superior resistance to high temperatures and aggressive fluids compared to standard Nitrile (NBR). A supplier who can specify the seal material demonstrates a higher level of product knowledge.
- Bearings: The internal bearings support the rotating group under immense pressure. Are they from a reputable bearing manufacturer? Low-quality bearings can lead to rapid failure.
- Gerotor/Geroler Set: This is the heart of the motor. It requires precise machining and hardening to function efficiently and resist wear. Reputable manufacturers invest heavily in the technology to produce these components to tight tolerances. Ask if the supplier has information on their manufacturing and quality control processes. Adherence to ISO 9001 standards is a positive indicator.
- Housing: The motor's body must be made from high-quality cast iron to withstand continuous pressure cycles without fatigue.
How to Compare Datasheets: An Apples-to-Apples Analysis
Once you have a potential replacement, request its technical datasheet. Place it side-by-side with the datasheet for the original Danfoss motor. This comparative analysis is your final technical check.
Create a checklist:
- Displacement: Are they identical or within an acceptable tolerance (e.g., +/- 2%)?
- Pressure Ratings: Is the continuous pressure rating of the replacement equal to or higher than the original? Is the intermittent rating also sufficient?
- Speed Ratings: Is the maximum continuous RPM of the replacement suitable for your application's flow rate?
- Dimensional Drawings: Carefully compare the drawings. Check every dimension: shaft length and diameter, keyway size, flange bolt pattern, pilot diameter, overall length, and port locations. Do not assume "it looks the same." Use a ruler or calipers on the drawings if necessary.
- Performance Curves: Look at the graphs showing torque, flow, and efficiency. Do the performance curves of the replacement closely mirror those of the Danfoss motor? This indicates that it will behave similarly under varying loads and speeds.
The Value of Regional Expertise: Sourcing for South America, Russia, and Southeast Asia
For customers in diverse global markets, a supplier with regional expertise offers significant advantages. Such a supplier understands the common types of machinery used in local industries (e.g., sugarcane harvesters in Brazil, mining equipment in South Africa, fishing vessels in Southeast Asia). They are more likely to stock the relevant Danfoss replacement series. They may also have a better grasp of the logistical challenges of shipping to your location and can advise on the best and quickest shipping methods. Furthermore, they may be better equipped to provide support in a local time zone and understand the specific environmental and operating conditions your machinery faces, such as high humidity, dust, or extreme temperatures. This local context can be invaluable in ensuring you not only get the right part but also the right support to keep it running.
Step 4: The Installation Process: Ensuring a Seamless Transition
Procuring the correct replacement motor is a major victory, but the project is not complete until that motor is installed correctly and the machine is back in service. The installation phase is critically important. A surprising number of new motor failures are not due to a defect in the motor itself, but rather to mistakes made during installation. A rushed or careless installation can introduce contaminants, cause misalignment, or subject the new motor to damaging conditions from its very first rotation. Following a methodical, clean, and careful process is the best way to protect your investment and ensure a long service life for the new component.
Pre-Installation Checklist: Preparing the Machine
Before you even unbolt the old motor, you must prepare its environment. The goal is to create a clean slate for the new unit.
- Safety First: Ensure the machine is turned off, and all stored hydraulic energy is released. Lock out the power source (e.g., disconnect the battery or main electrical switch for the electric hydraulic pump) to prevent accidental start-up. Place a tag on the controls indicating that the machine is under maintenance.
- Clean the Area: Thoroughly clean the area around the old motor. Use a degreaser and rags to remove all dirt, grease, and debris. This prevents dirt from falling into the hydraulic system when you disconnect the hoses.
- Drain the Old Motor: If possible, place a drain pan under the motor and disconnect the case drain line (if present) to allow it to drain. Then, carefully loosen and disconnect the main pressure lines. Be prepared to catch spilling fluid.
- Cap Hoses and Ports Immediately: As soon as you disconnect a hydraulic hose, cap it with a clean plastic cap or plug. Do the same for the open ports on the old motor as you remove it. This is the single most important step to prevent contamination. An open hydraulic line is an open invitation for dust, dirt, and moisture.
- Critically Assess the Hydraulic Fluid: Look at the fluid that drained from the system. Is it dark and burnt-smelling? Does it look milky (indicating water contamination)? Are there visible metal particles? If the fluid is in poor condition, the old motor's failure may have contaminated the entire system. In this case, simply replacing the motor is not enough. You must flush the entire hydraulic system and replace the filters. Installing a new motor into a system full of contaminated oil is guaranteeing its premature failure (Skaistis, 1988).
The Physical Swap: Best Practices for Mounting and Connection
With the old motor removed and the area prepped, you can begin installing the new one.
- Unbox and Inspect: Carefully unbox the new motor. Compare it one last time to the old motor. Verify the shaft, flange, and ports are a perfect match. Ensure any plastic or rubber shipping plugs are removed from the ports before installation.
- Fill the Case: If the motor has a case drain port, it is best practice to pre-fill the motor housing with clean hydraulic fluid through this port before installation. This ensures that the internal components are lubricated from the very first moment of operation.
- Mount the Motor: Carefully position the new motor onto the mounting bracket. Ensure the pilot fits snugly into the machine's bore without being forced. Hand-tighten the mounting bolts in a star or crisscross pattern to ensure the motor sits flush against the mounting surface. Then, use a torque wrench to tighten the bolts to the specification provided by the motor supplier or the machine manufacturer. Uneven or incorrect torque can distort the motor housing.
- Connect the Shaft: Align the motor shaft with the hub or gearbox. If it is a keyed shaft, ensure the key fits snugly in both keyways. For a splined shaft, you may need to rotate it slightly to get the splines to engage. It should slide together smoothly. If you need to use force, something is misaligned. Do not hammer the shaft into place, as this can damage the motor's bearings.
- Connect the Hoses: Connect the case drain line first (if applicable). Then connect the main pressure lines. Ensure you are connecting the hoses to the correct ports for the desired direction of rotation. On many bidirectional motors, the ports are labeled 'A' and 'B'. Reversing them will reverse the default direction of rotation. Ensure all fittings are clean and tighten them to the correct torque specification to prevent leaks.
Initial Start-up and Break-in Procedure
The first few minutes of a new motor's life are critical. A gentle break-in procedure allows the internal parts to seat properly and ensures the system is free of air.
- Low-Pressure, No-Load Start: If possible, start the system at a low engine/pump speed and with no load on the motor. Let the motor turn slowly for several minutes.
- Check for Leaks: During this initial run, carefully inspect all connections—the port fittings and the shaft seal area—for any signs of fluid leaks. If a leak is found, shut down the system, release the pressure, and tighten the fitting as needed.
- Listen and Feel: Listen for any unusual noises like grinding or whining, which could indicate a problem. Feel the motor housing; it will get warm, but it should not become excessively hot to the touch very quickly.
- Purge Air from the System: Cycle the motor back and forth several times (if the application allows) to help purge any trapped air from the motor and lines. Air in a hydraulic system can cause erratic, jerky operation and damage components.
- Gradually Increase Load and Speed: Once the motor has run smoothly with no load for a few minutes, you can gradually increase the speed and begin to apply a load. Monitor its operation closely during the first hour of use. This careful start-up is a small investment of time that pays large dividends in reliability.
Common Installation Pitfalls and How to Avoid Them
- Contamination: The number one killer of hydraulic components. Always use clean tools, cap open lines, and work in a clean environment.
- Incorrect Rotation: Connecting the main lines backward. This can cause major problems in applications that are only designed to work in one direction. Double-check your connections.
- Case Drain Neglect: If a motor requires a case drain and the line is blocked or not connected, pressure will build up inside the motor housing very quickly, blowing out the shaft seal. Always ensure the case drain line has an unrestricted path back to the tank.
- Misalignment: Forcing the motor to mount or the shaft to connect. This puts extreme stress on the bearings and shaft, leading to rapid failure. If it doesn't fit easily, stop and find out why.
By treating the installation not as a simple mechanical task but as a precision procedure, you ensure that the effort and expense you put into selecting the right hydraulic motor to replace a Danfoss orbit motor results in a successful and lasting repair.
Step 5: Post-Installation Care and Performance Verification
The installation is complete, and the machine is running again. It is tempting to consider the job finished, but the final step is to ensure the new motor not only works but works correctly and continues to do so for its expected lifespan. This phase is about verification and establishing a proactive maintenance mindset. By monitoring the new component's performance and adhering to a simple care regimen, you can confirm the success of your replacement project and catch any potential issues before they escalate into major problems.
Establishing a Baseline: Measuring Initial Performance
Immediately after the break-in period, it is valuable to establish a performance baseline for the new motor. This gives you a reference point to compare against in the future. If you have the necessary diagnostic tools, this process can be quite precise. Even without them, a careful observational approach is beneficial.
- Cycle Time Measurement: With the machine at normal operating temperature, measure the time it takes for the motor to complete a standard work cycle. For example, how long does it take for a conveyor to move a certain distance, or for a winch to lift a known weight? Record this time. A significant slowing down in the future could indicate motor wear or a problem with the electric hydraulic pump.
- Temperature Monitoring: Use an infrared temperature gun to measure the temperature of the motor housing after it has been operating under a normal load for at least 30 minutes. Record this temperature and the ambient air temperature. A future reading that is significantly higher under similar conditions could signal a problem like excessive internal leakage (wear) or inadequate system cooling.
- Pressure Checks (if possible): If your system has built-in pressure gauges or test ports, record the operating pressure during a normal work cycle and the system's relief valve setting. A drop in operating pressure for the same task could indicate a problem.
- Visual and Auditory Inspection: Walk around the machine while it is running. Record any observations about the new motor. Is it running quietly and smoothly? Are there any vibrations? A simple video taken with your phone can be a great baseline record.
This baseline data is your new motor's first "health check-up." It provides an objective foundation for all future monitoring.
Long-Term Monitoring and Preventative Maintenance
A hydraulic motor, like any hard-working mechanical component, benefits from a program of regular, preventative care. This does not have to be complex or time-consuming.
- Regular Fluid Checks: Hydraulic fluid is the lifeblood of the system. Follow the machine manufacturer's recommendations for fluid and filter change intervals. Periodically inspect the fluid's condition. If it appears dirty, milky, or burnt, change it.
- Fluid Analysis: For critical and high-value machinery, consider implementing a program of regular oil sampling and analysis. A laboratory can analyze the fluid for contaminants (like dirt and water) and wear metals. An increasing level of bronze, for example, could give you an early warning that the motor's internal components are beginning to wear, allowing you to schedule a replacement before a catastrophic failure occurs (Watton, 2007).
- Routine Inspections: During regular machine walk-arounds, make a point to look at the motor. Check for any new leaks, particularly around the shaft seal and port fittings. Ensure mounting bolts remain tight. Listen for any changes in its operating sound.
- Keep it Clean: A clean motor is easier to inspect and also runs cooler. Periodically and safely clean away any buildup of dirt, grease, or debris from the motor's housing.
Troubleshooting Common Issues with a New Motor
Even with careful selection and installation, problems can sometimes arise. Knowing what to look for can help you diagnose the issue quickly.
- Low Torque or Speed: If the motor is slow or seems weak, the issue might not be the motor itself. The first place to check is the hydraulic pump and its prime mover (e.g., the engine or electric motor). Is the pump providing the correct flow and pressure? Also, check the system's relief valve to ensure it is not stuck partially open, bleeding pressure away from the motor.
- Overheating: A new motor running excessively hot can be a sign of several problems. The system pressure might be set too high. The fluid viscosity might be incorrect for the operating temperature. Or, there could be an issue with the system's cooler (if equipped). It can also indicate that the motor selected is too small for the application and is being constantly overworked.
- Leaking Shaft Seal: A shaft seal that fails very soon after installation is almost always a sign of a problem with the case drain line. If the motor requires a case drain, ensure the line is not blocked, kinked, or improperly routed. Excessive pressure in the motor housing will force fluid past the seal.
- Premature Failure: If a new motor fails within a short period, it is crucial to perform a failure analysis before installing another one. Was the failure caused by contamination? The presence of scoring or abrasive wear on internal parts points to dirt in the system. Was it due to over-pressurization? A cracked housing or sheared shaft suggests this. Simply installing another motor without finding and fixing the root cause will only lead to another failure.
When to Engage with Your Supplier for Technical Support
Do not hesitate to contact the supplier of your aftermarket motor if you encounter problems you cannot diagnose. A reputable supplier wants your replacement to be successful. When you call them, be prepared with the information from your "motor passport," your installation notes, and the details of your baseline performance check. The more information you can provide, the better they will be able to assist you. This collaborative approach turns a simple transaction into a supportive partnership, which is the ultimate goal when you decide to hydraulic motor replace Danfoss orbit motor.
Frequently Asked Questions (FAQ)
1. Can I use a replacement motor with a slightly different displacement?
It is strongly advised to match the displacement as closely as possible. A smaller displacement motor will run faster and produce less torque, while a larger one will run slower and produce more torque (at the same pressure). A small deviation (less than 5%) might be acceptable in some non-critical applications, but it will change the machine's performance. For any significant difference, a full system engineering review is necessary to ensure compatibility with the pump output and structural limits of the machine.
2. My old Danfoss motor doesn't have a case drain. The replacement does. What should I do?
If the replacement motor has a case drain port, you must use it. The case drain relieves internal pressure that builds up from fluid bypassing the internal components, which protects the shaft seal. You must run a dedicated, low-pressure line from the motor's case drain port directly back to the hydraulic reservoir. Do not plug the case drain port or tee it into one of the main pressure lines, as this will cause immediate and catastrophic failure of the shaft seal.
3. Are aftermarket hydraulic motors as reliable as OEM Danfoss motors?
The reliability of an aftermarket motor depends entirely on its manufacturer and supplier. High-quality aftermarket motors from reputable sources are engineered to meet or exceed OEM specifications and can offer comparable service life at a lower cost. However, the market also contains low-quality parts. The key is due diligence: vetting the supplier, checking for warranties, verifying manufacturing standards (like ISO certification), and confirming technical specifications via datasheets.
4. The shaft on the replacement motor is slightly longer. Can I still use it?
Possibly, but with extreme caution. You must ensure the extra length does not cause interference with other parts of the machine, like guards or frame members. More importantly, you must ensure the hub or coupling still engages with the shaft correctly. If the hub doesn't slide far enough onto the new shaft, it may not engage the full length of the key or splines, leading to a weak connection that could fail under load. It is always best to match the shaft length exactly.
5. How do I know if I need to flush the hydraulic system before installing the new motor?
You should flush the system if the old motor suffered a catastrophic failure (e.g., seized, generated a lot of metal particles) or if the hydraulic fluid is visibly contaminated (dark, milky, or full of debris). Installing a new motor in a contaminated system is the primary cause of premature failure. A proper flush involves draining the old fluid, cleaning the reservoir, replacing all filters, and circulating a special flushing fluid or fresh oil through the system until it is clean.
6. What is the difference between an "orbit motor" and a "gerotor/Geroler motor"?
These terms are often used interchangeably. "Orbit motor" is a general term for a type of low-speed, high-torque (LSHT) motor that uses an orbital principle. Gerotor and Geroler are specific, trademarked designs for the gear set inside an orbit motor. A Gerotor uses a direct metal-to-metal contact between the inner and outer gears. A Geroler, a design popularized by Eaton and also used by Danfoss, places rollers between the lobes of the outer gear, which reduces friction and wear, generally improving efficiency and service life.
7. My machine uses an electric hydraulic pump. Does this change how I select a motor?
The selection principles remain the same—you must match the motor's specifications to the system's requirements. However, with an electric hydraulic pump, the flow rate is often very consistent. This makes it even more important to get the motor displacement correct to achieve the desired output speed. You must also ensure the motor's pressure ratings are compatible with the maximum pressure the electric pump unit can generate.
Conclusion
The task of selecting a hydraulic motor to replace a Danfoss orbit motor is a journey that begins with a challenge—a machine down, an expensive OEM part, or a long wait for delivery—and ends with an empowered decision. It is a process that rewards diligence, precision, and a healthy dose of skepticism. By moving through the five proven steps—decoding the old unit's identity, mastering the critical specifications, vetting suppliers, executing a flawless installation, and committing to post-installation care—an operator transforms from a passive parts-replacer into an active asset manager.
This methodical approach demystifies the process, turning technical codes and specifications from an intimidating barrier into a clear roadmap. It reframes the choice between OEM and aftermarket not as a gamble on quality but as a strategic evaluation of value, reliability, and availability. Ultimately, the confidence to install an aftermarket motor comes from the knowledge that you have verified every critical parameter, from the displacement that dictates its power to the flange that secures its foundation. You have not simply bought a part; you have engineered a solution. This ensures that when the power is restored and the machine whirs back to life, it does so with a component that is not just a replacement, but a worthy successor.
References
Dalton, T. R., Crosby, M., & Hassert, M. (2017). Technician's guide to the cat-af-1 hydraulic system. Caterpillar University Press.
Skaistis, S. J. (1988). Hydraulic system cleanliness. Vickers, Incorporated.
Watton, J. (2007). Fundamentals of fluid power control. Cambridge University Press. https://doi.org/10.1017/CBO9780511541753
Zhang, H., & Chen, J. (2021). Hydraulic transmission technology. Springer. https://doi.org/10.1007/978-981-15-6200-3


